
Harness FME Application
Overview
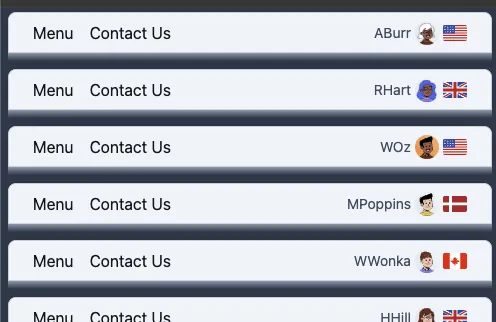
The application shows the navigation bar of many users at once. Each title bar is an independent user with name, settings, and geographic location.
With Harness Feature Management and Experimentation (FME), you can easily enable a new feature in real-time with automatic monitoring that provides critical feedback into the feature’s success!

The goal
The goal was to provide a real-world example making it easy to understand progressive feature release and dynamic configuration.
The scenario
We work for GlobalCorp and our job is to implement the new OmniView feature. It allows our users to see all of their content in a single screen. There are performance concerns- although in isolated test environments everything was OK. With Harness FME, we’ll be able to progressively rollout the feature, monitor it, and rollback immediately if any issues arise.
Also, the content management team at GlobalCorp isn’t technical, but keeps requesting code changes to modify the Contact Us page. Using dynamic configuration, we’ll allow that team to handle the wording and images without code changes.
Setup
First, we’ll configure Harness FME for GlobalCorp, and then launch the GlobalCorp website with an SDK key linked to Harness.
Harness FME
These steps configure FME for a new project with 2 attributes. The attributes are built into the application to safely identify users without exposing any sensitive information.
Create project
-
Login to your Harness FME account.
-
In the bottom left of the blue menu bar, click your name, then Admin settings.

-
Select projects (inset grey menu) and then Create Project top right corner.
-
Name your project
GlobalCorp(name can be anything) and click Create.Retrieve SDK key
-
Find your app, go over to the right, then under Actions click View.
-
In the tabs at the top, click SDK API Keys, find the
Client Side&Prodversion of your application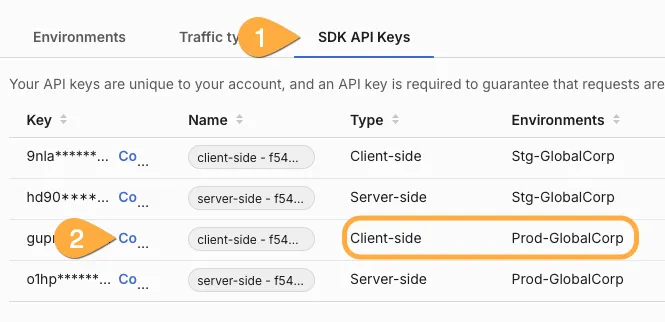
-
Save this key for later when setting up the application.
Add attributes
-
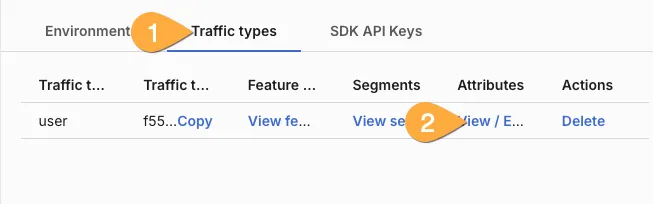
In the tabs at the top, click Traffic types, then under Attributes View/Edit.
-
In the top right corner, click Actions, then Create an attribute.
-
Name it
Preview, give it a description (optional) and choose Type: Boolean. Click Save -
Click Actions, Create again. Name the second attribute Region, choose Type: String, and add these suggested values:
Terminal window GB, US, CA, DK, FR -
Click Save.
Add feature flags
-
On the left blue bar, click project, then click your project (i.e. GlobalCorp), then feature flags.
-
On the inset menu, click Create feature flag. Name it
OmniView. Open the treatments accordian on the right and confirm the options are simply ‘on’ and ‘off’. -
Click Create feature flag again on the inset menu and name it
Contact_Us. (again, name and case is important!) -
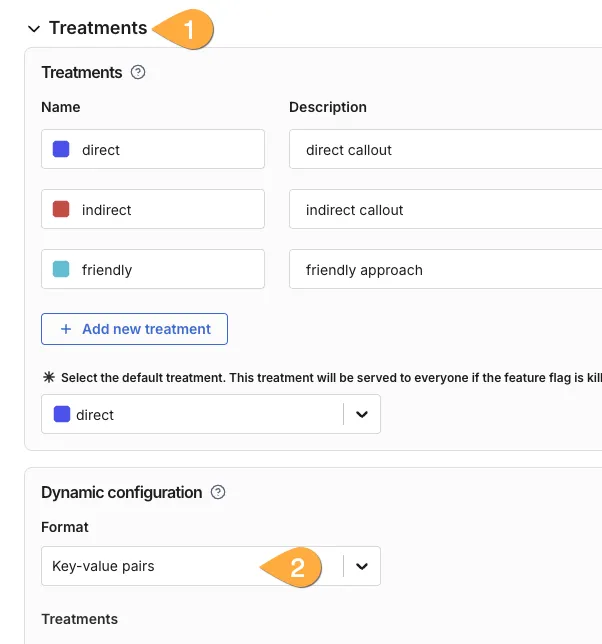
Ensure Production Environment is selected, open the Treatments accordian, and update the Treatments section as shown. Click + Add new treatment for the third option.
Color Name Description blue direct direct callout red indirect indirect callout green friendly friendly approach n/a default treatment (below) direct 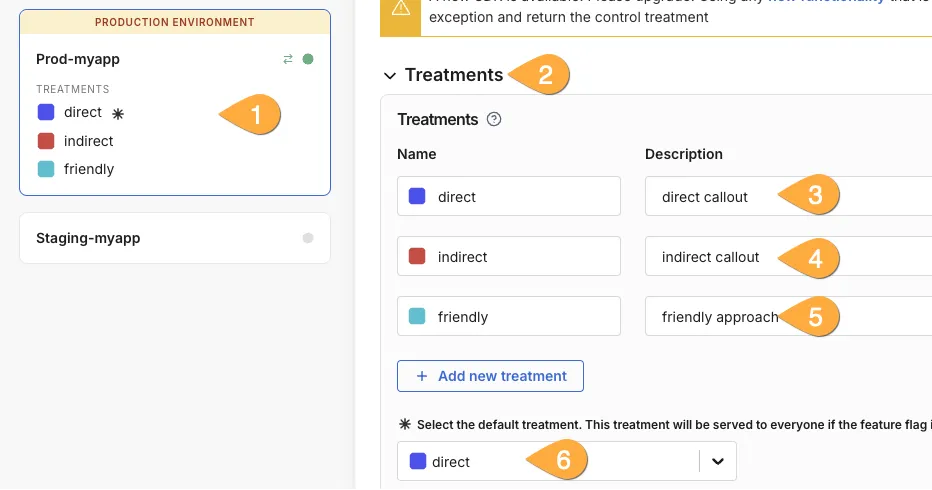
-
Below the treatments section, choose Format: JSON, and then copy the JSON blocks below into each section:
direct {"message": "Call us for help anytime!","image": "/help1.png"}indirect {"message": "We're here if you need us!!","image": "/help3.png"}friendly {"message": "We get it! Things get confusing, we can help.","image": "/help2.png"}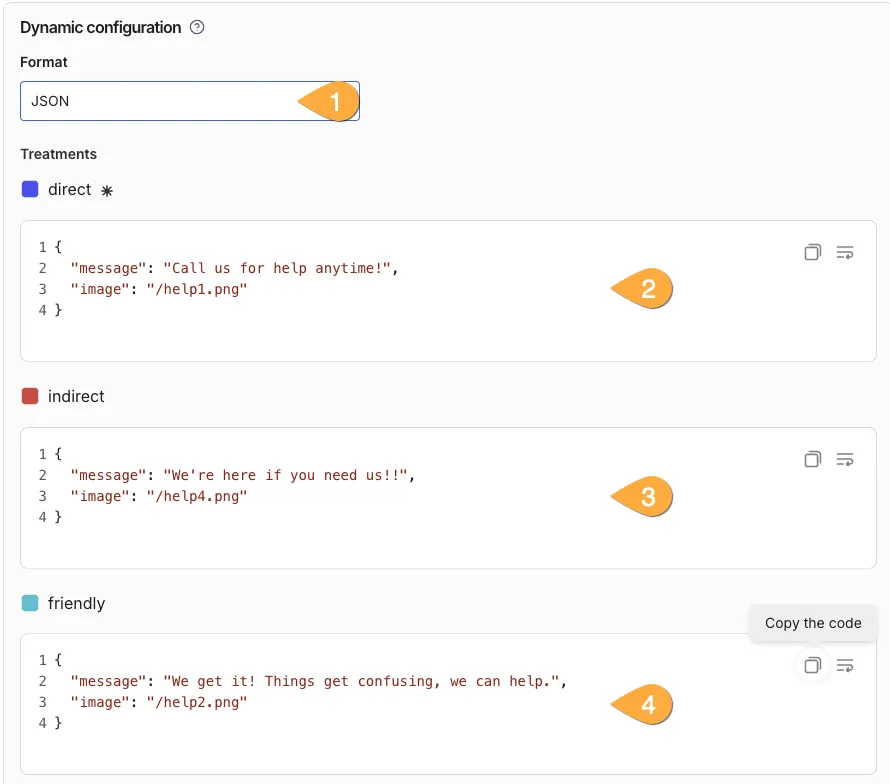
-
Finally, in the Targeting section, switch the targeting rules to Distribute treatments as follows and split the methods evenly (33 33 34).
Application
The application is a simple next.js/react/javascript application running in a container. The full repo is available here if you want to modify or build on it.
Option 1: Docker Compose
-
To get up and running quickly, use the following command to download the docker compose file.
Terminal window curl -k -L 'https://raw.githubusercontent.com/suchcodewow/userflags/refs/heads/main/docker-compose.yaml' > docker-compose.yaml -
Edit the yaml file and drop in the FME key you generated.
Terminal window ports:- 80:3000 <- Change 80 to another port if neededenvironment:PUBLIC_NEXT_SPLIT_KEY: "" <- Add your key between quotesNEXT_PUBLIC_TRAFFIC_TYPE: "" -
(Optional) Modify the port to something else if you have another web server running on port 80.
-
Launch the container with:
Terminal window docker compose up -d -
Open a browser and point it to http://localhost. (Or http://localhost: yourport)
Option 2: Build locally
-
Clone the full repository locally with:
Terminal window git clone https://github.com/suchcodewow/userflags -
In the directory where you downloaded the application, rename
example.envto.env. -
Edit the file and add your SDK key between the quotes:
Terminal window NEXT_PUBLIC_SPLIT_KEY="YOUR KEY HERE"NEXT_PUBLIC_TRAFFIC_TYPE="" -
Install packages and start the development server with:
Terminal window npm Installnpm run dev -
Open a browser to
http://localhost:3000.Using the application
You can use multiple target types for the new OmniView feature- and the content management team can dynamically adjust wording/images.
At the start, your application should like this:
User target
-
In Harness FME, ensure your project is selected, click Feature flags, production environment on the inset tab, and then open the Targeting accordian.
-
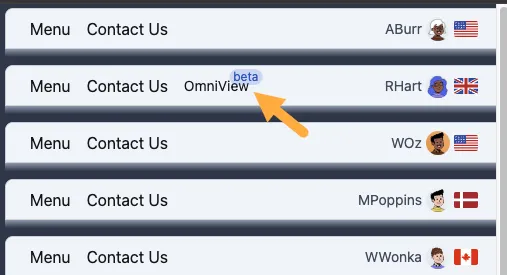
Click + Add new individual target, type in
RHart(spelling and case matter), click + Add, and then Review Changes blue button at the top. -
Click Save on the pop-up. The application will immediately reflect that RHart has access to OmniView!
Attribute based targets
-
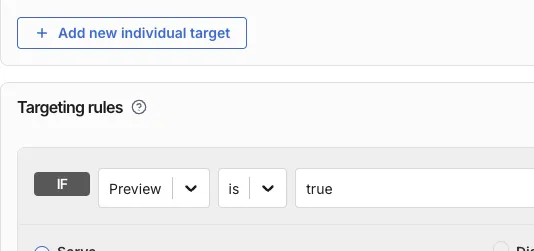
To use attribute based targeets, scroll to targeting rules and click Add attribute based targeting rules.
-
You can target users you have “opted in” to preview features (these are shown with an orange background behind their avatars) by selecting User attribute-> Preview, IS, TRUE.
-
Remember to click Review changes and save. All preview users (orange avatar background) will immediately have OmniView.
-
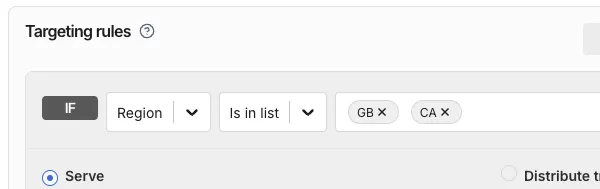
And/or enable the flag based on geography attribute!
Modifying dynamic content
The content management team received several messages from users receiving the
indirecttreatment. Apparently users didn’t like being portrayed as a drowning person. Weird.
Fortunately, the team has prepared additional images and with Dynamic configuration, the content management team can immediately address this.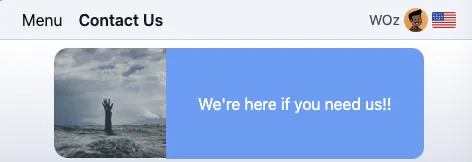
-
Click “Contact Us” on any user’s title bar to zoom into the Contact Page for all users. You still have the context of whether they have OmniView or not- and while it doesn’t show as many users, the content of the Contact Us page is visible.
-
Click feature flags in the left blue menu, select the Contact_Us flag, and ensure production environment on the inset menu is selected.
-
Open the treatments accordian and scroll down to dynamic configuration. Change the Format to Key-value pairs.
-
In the indirect (red) configuration pane, change the image from
help3.pngtohelp4.png.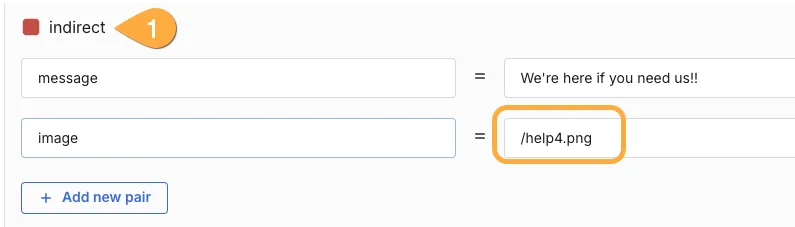
-
Click the blue Review changes button at the top, then Save. The image will instantly update to a new, hopefully more palatable image.
